Turn Heads with LED Skates that Dance to Music

Rob is one of the earliest members of the Roller Skate Dad Club. In his free time, he loves to roller skate and build LED light up roller skates. If you have questions about this article, please leave a comment below or reach out to Rob directly at LEDskatelights@gmail.com.
Before You Begin
Because of the differences in skates, there is not a single, “always works” way to install the lights. I will provide tips, guidelines, and lots of pictures as an example of how I’ve done it on a couple of different pairs of skates, but you will have to work out an approach that works best for you.
You will find it helpful to zoom up the pictures in this document to clearly see the details in the examples.
Install skate lights at your own risk–I make no guarantees of performance or safety. However, there have been no problems with either light set installed in these examples.
If you have any questions, please email me at LEDskatelights@gmail.com and I’ll be happy to help any way I can.
After you’re done, please show off your work and send me pictures at LEDskatelights@gmail.com. We will be sure to feature them right here on this article, too.
Please tell me about anything you did differently in your installation. I’m always interested in hearing about others’ creativity.
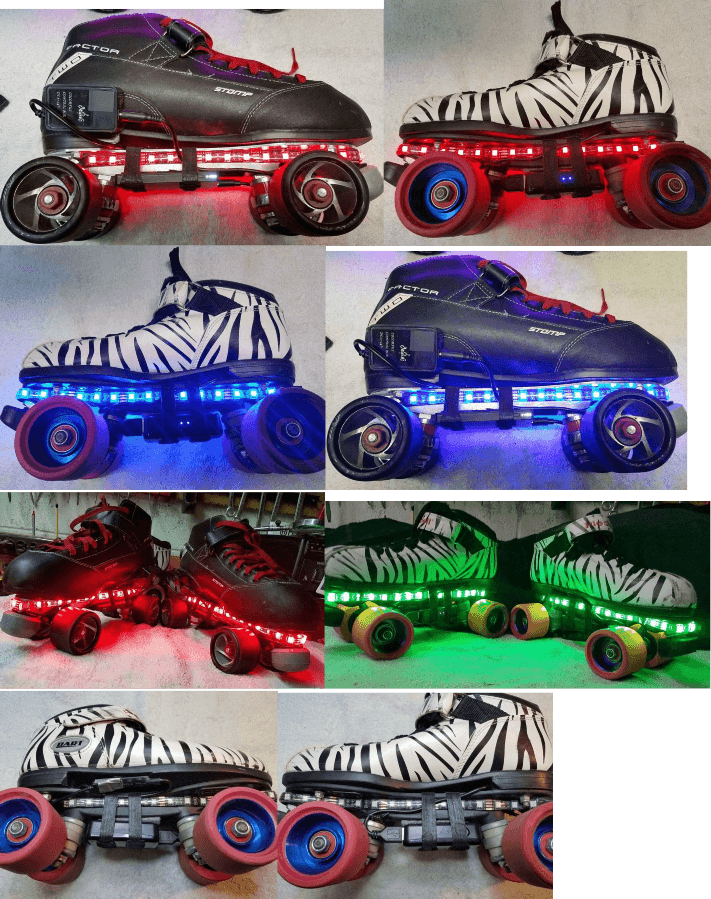
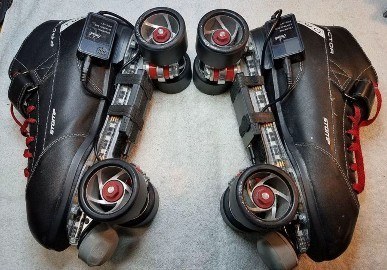
Light Up Roller Skates in Action – What You Can Build, too!
Here is what we are going to be making once everything is completed.
Skate Holder (Optional)
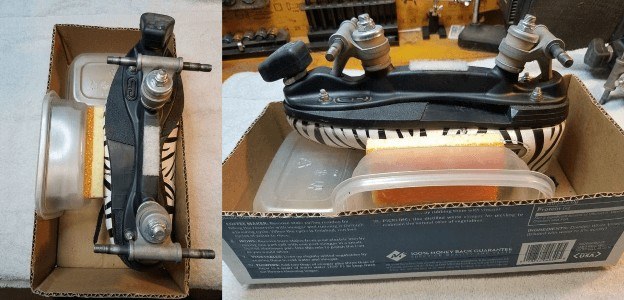
To make it easier to clean my skate wheels and work on my skates, I made a basic skate holder.
If you’d like to do the same, take a fairly narrow cardboard box and cut it off, leaving it maybe 6 inches tall. You’ll need something to place under the toe of the skate so it will sit level, and something to place beside the skate to keep it from falling over. I used a couple of old plastic food containers. I glued a sponge to one of them to allow some flexibility in the “prop”.
Light Installation Overview
The main steps are:
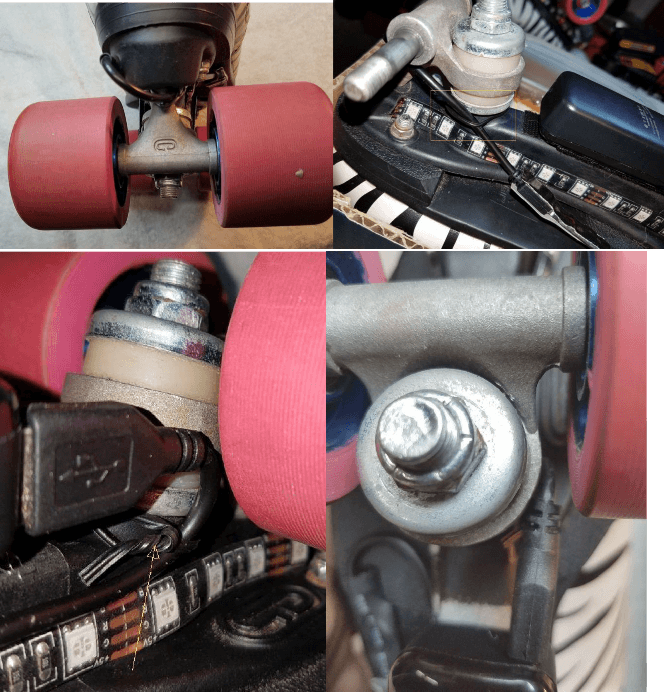
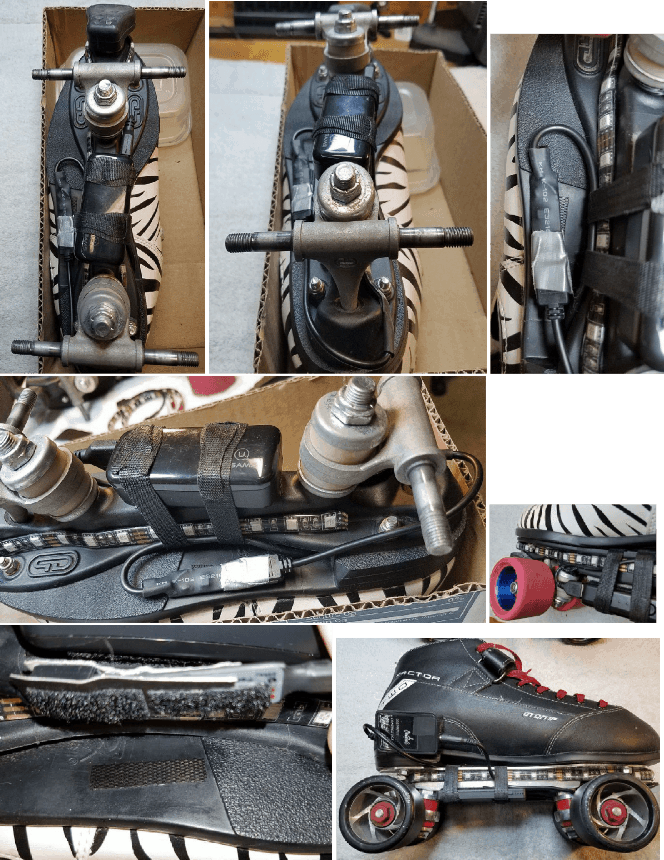
- Stick a self-adhesive LED light strip all around the vertical part of your skate plate.
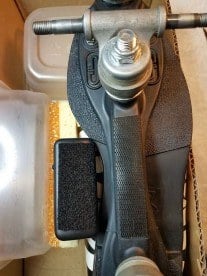
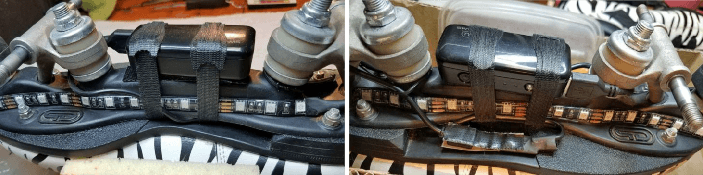
- Use Velcro strips to attach a mic box to the boot.
- Use Velcro to attach a rechargeable USB power bank to the bottom of the skate plate, between the trucks.
- Secure all the connecting cables, hide them as much as possible, and make sure they don’t interfere with the wheels or operation of the skate.
- Use 2 Velcro straps to further secure the USB power bank and the cables. Velcro cable ties work well for this.
- Repeat for the other skate. It’s best to do each step on both skates, then move to the next step, rather than completing one skate then starting the second one.
Light Installation
Removing all the wheels first makes the installation easier. Use a skate wrench or ½” socket.
Use a soft cloth and rubbing alcohol to clean all around the vertical portion of the plate, where the LED strip will stick on. Also clean any areas where Velcro will be stuck (like the bottom of the central rib between the trucks.
When you receive them, make sure the power banks are fully charged. They may be charged before shipping but may discharge in transit. If they need charging, use the recommended dual-output charger and micro-USB cables to charge them.
– Power banks often have 4 LEDS, indicating 1-25%, 25-50%, 50-75%, and 75-100% charged.
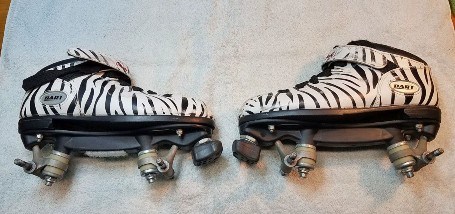
NOTE: The Zebra skates in the pictures do not have a mic box. They only have a small controller that responds to the remote. The black skates have a mic box.
Plan to spend a lot of the installation time planning the layout and cable routing that works best for YOUR skates. Plan the LED strip routing before removing the backing. “Dry run” where the strips and cables will go before peeling off the backing and sticking things down.
Before installing, connect the LED strip, music box, & power bank to make sure everything works. Do this for both sets of strip/box/power. Test the remote(s). (You will need to install a CR2032 coin battery in each remote).
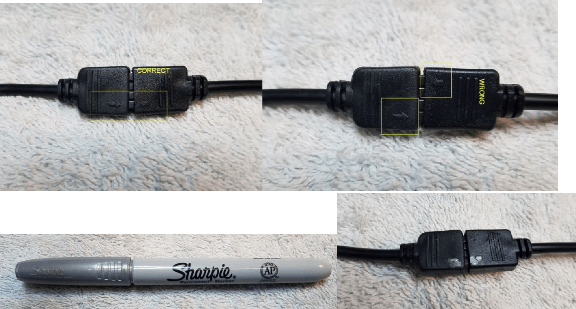
Make sure to match up the arrows on the connector between the controller and the LED strip. They are molded and can be hard to see. I dot the arrow on each side of the connection with a silver Sharpie to make sure I connect them correctly.
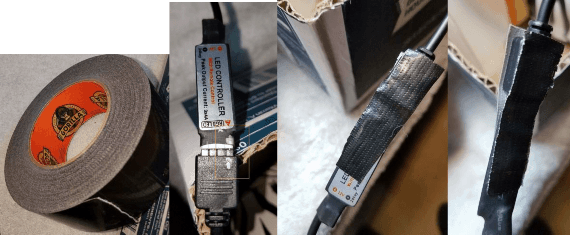
After connecting them, cut a small piece of black Gorilla tape or silver duct tape and apply it across the connection to hold the small 4-wire connection together. Put another one on the other side. HOWEVER, don’t apply these tape pieces until later in the process, when you’ve attached the LEDs and music box and are finalizing the cable routing. While you’re working with the cables, it’s easier to leave them unconnected until everything is in its final location, then tape them up to make sure they stay connected.
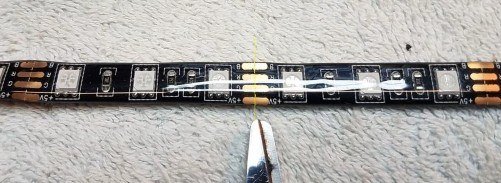
If the LED strip is too long, it can be cut to length. Make sure to cut on the copper dots.
PLAN the mic/music box location. Pick somewhere it is not likely to get knocked loose. I recommend either the back of the skate or low on the inside of the heel area. Cable routing and clearances will be affected by where you put the music box, so again, dry run it and plan ahead. Once you start sticking things down, it’s harder to make changes.
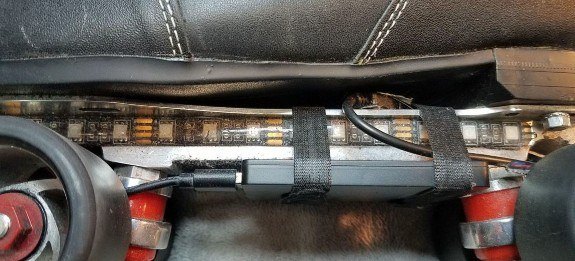
Because it’s so close to the floor, the mic box will “hear” the wheel noise and change colors in response to those sounds, almost continuously. If you stop and are near a speaker, it will react/change to the music, but when you’re rolling the wheel noise will override the music. Not a bad thing, but just be aware that the light changes won’t really be synced with the music.
PLAN the cable routing. Use the space between the plate & boot, in front of the heel, to hide wires. You may need to coil up some wires and twist tie them together to remove slack and fit them neatly into that space.
Decide which side of the skate the LED strip connector cable should end up on to connect to the mic box without excess cable.

PLAN the USB power cable route and power bank placement. The LED kits were originally designed for a different application and the USB cable is longer than is ideal for roller skates. Find a place to store the excess cable. You may have to wind it around the toe stop or a truck to take up the slack.
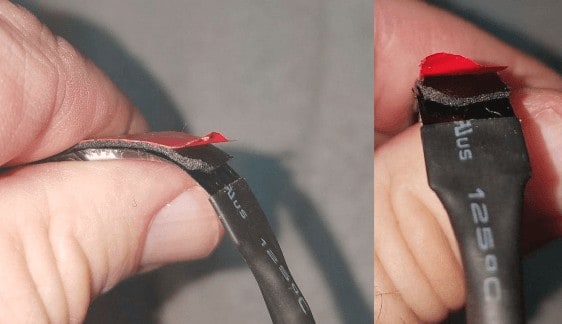
When ready to stick on the LED strips, peel off the red backing. Make SURE you aren’t peeling the foam backing off the strip, but just peeling the thin red plastic film off the foam backing, exposing the adhesive.
Start from the cable end. If you get to the end and there is excess, you can cut the LED strip at the copper dots ONLY (aligned with the scissors in the picture below)

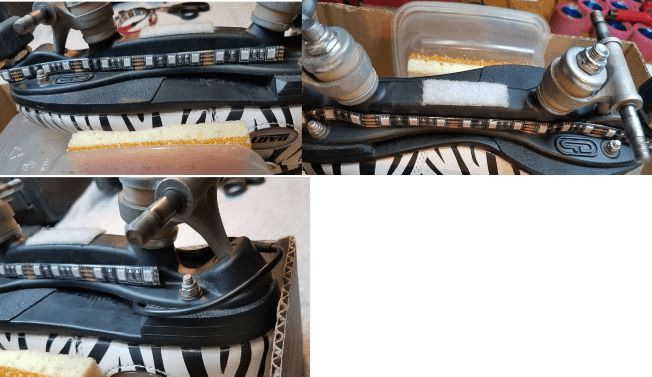
Snug the strip up to the plate, making sure it’s straight. If the truck has any indentions, make sure the strip goes down into them and you press it into them snugly so it will stick.
After you get to the end, go back and press down all along the length of the strip to make sure it’s stuck well everywhere.
If you ever need to remove the LED strip, it will likely tear the foam backing and leave little pieces of the foam stuck to your skate truck, which you can then remove individually. The strip will probably not be reusable.
Over time, the end of the LED strip may start to unstick. If so, just re-stick it with some superglue.
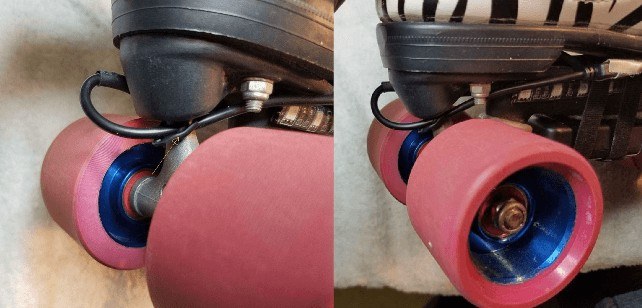
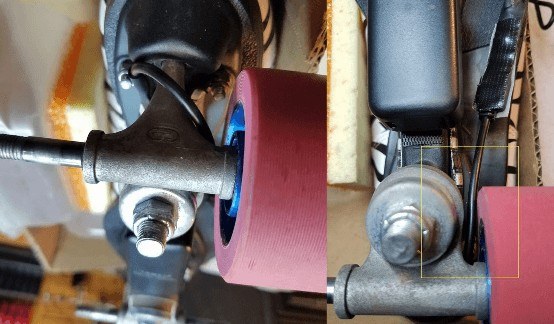
Keep all the wires from touching the wheels, interfering with the truck movement, blocking the LEDs, and no sharp bends. Temporarily slip some of the wheels back onto the axles to make sure there is enough clearance.
You may need to use a few black wire twist ties (not included) to tidy things up. Most people have a few of these lying around from other purchases. You can also use bread bag twist ties or garbage bag ties, but black hides them better.
Mirror-image the setup on the other skate. For example, if the connector cable is on the inner side of the first skate, make sure it’s on the inner side of the second skate.
Since we use Velcro and wire ties to secure things it’s possible to adjust them around a bit if needed.
Velcro brand Industrial Strength Low-Profile works well. It’s readily available at Walmart, Home Depot, & Lowes Hardware.
Use stick-on Velcro to attach the USB power bank to the bottom of the “rib” between the trucks.
Leave enough clearance to connect both the large USB plug that powers the lights (without interfering with the wheels or trucks) and the micro-USB port used to recharge the power bank.
If your skates have a short wheelbase (distance between the trucks), you may have to remove a wheel to access the micro-USB recharging port on the USB power bank.
Pull the Velcro straps tight. Make sure the straps are routed over top of the cables so they will hold the cables in place that are stashed in the space between the boot & plate. Make sure everything is secure. You don’t want to have a length of cable dragging behind you, potentially tripping you or others.
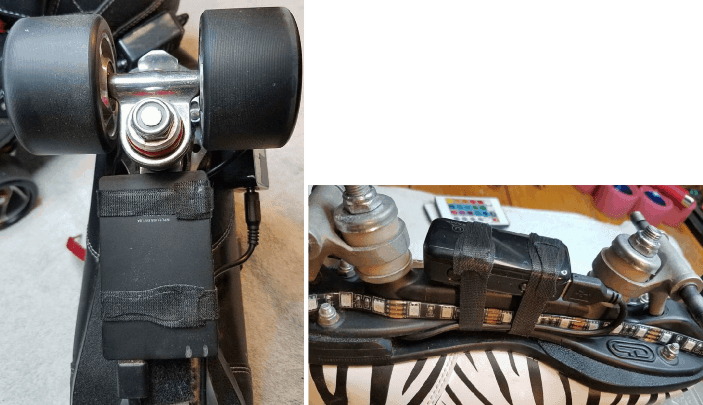
The Velcro straps hold the cables in place on top of the plate, and add a fail-safe for the power bank. Between the Velcro holding the power bank to the plate AND the Velcro straps, the power bank should not be able to fall off.
Power Banks
The micro-USB cable only fits into the port on the power bank one way. Use a silver Sharpie to make a couple of small lines on the edge of the power bank to indicate exactly where the edges of the port are, and using a black Sharpie to put a dot on the side of the micro-USB connector that will be visible from the bottom of the skate. The silver guide marks and the black orientation dot will help you get the micro-USB cable plugged in correctly and easily in the future.
I use different power banks, depending on the size of the skates. Some power banks have to be turned on and off independently from the lights.
- If so, press the button for 1 second and release to turn on, then press use the remote ON button to turn on the lights.
- After your session, press the remote OFF button to turn off the lights, then double-press the button on the power bank to turn it off.
Your powerbank may have both ports on one end, or the large output port may be on one end and the small micro-USB recharging port on the other end. Allow enough clearance to get the micro-USB cable inserted in the recharging port.
- If your skates have a short wheelbase (distance between the trucks), you may have to remove a wheel to access the micro-USB recharging port on the USB power bank.
The power banks should last at least 3-4 hours before recharging. Certainly enough for one skating session, maybe two.
- Remember to recharge both power banks after skating. I keep a “charging station” hooked up all the time, with the dual-output power adapter & 2 micro-USB cables. It’s ready to use when you get home from skating. Just plug them both up overnight.
To make sure the lights don’t accidentally come on & drain your battery between skating sessions, unplug the large USB connection cable from the power bank when you remove your skates after a session. Re-plug it before putting your skates back on at the next skating session
The remotes have a variety of buttons to change the LED colors, their change/pulse patterns, and the speed of the changes.
TIP – Younger kids are often attracted to the lights and may tell you they like your lights or ask about them. It’s fun to ask “what is your favorite color?”, then secretly use the remote to change the light color to that color. Like a magician, use a large hand gesture with one hand to point to the skates while pressing the correct remote button quietly with your other hand. Smaller kids will be amazed and think it is magic!
What & Where to Buy
The light kits I have used successfully are sold as “TV Bias/Background Lights”. Bias Lights are mounted around the back of a TV to improve the contrast & picture quality. They are typically plugged into a USB port on the TV so they power up & down with the TV.
These LED kits and the accompanying parts are available from 2 main online sources: Amazon.com and Aliexpress.com. Generally, Amazon will offer faster shipping and better return policies, but at a higher cost. Aliexpress ships directly from China so it can take 4-6 weeks for the items to arrive, but the pricing is typically half or less that of Amazon. If you’re impatient and want it fast, buy from Amazon. If you’re willing to wait, you can save a lot of money buying from Aliexpress. I will provide links from both sites for the various items needed. Links and availability can change over time, but these links all work as of May 2019.
LED Light Kits
The LED Bias light kits are available with different controllers, remotes, and different lengths.
I recommend 1m(eter) long. Sometimes the .5m is a little too short. The 1m doesn’t cost much more, it will always be long enough, and you can cut it to fit.
If you don’t care about being sound/music-reactive, the controller+remote+strip sets are smaller and you don’t have to find a place to mount the music (mic) box. The Zebra skates above have this type of controller setup. But, they don’t have as many different colors and light patterns as the music-reactive version.
I prefer the LED kits with 60 LEDs per meter. Many of the kits only have 30 LEDs per meter, which is fine, but the 60 LED strips are brighter and look better.
Some sellers offer both waterproof & non-waterproof LED strips. Waterproof is only slightly more expensive and adds a clear plastic layer over the LEDs. Although water protection isn’t needed for this application, I like the additional protection of the waterproof versions.
I recommend RF controllers, not IR.
- IR (infrared) controllers work, but the remote emits a beam of infrared light, which the controller (on the bottom of the skate) has to “see”. In practice, you have to aim the remote at the floor and bounce the light beam off the floor to the controller. If one controller is mounted on the inner side of the skate and the other controller is on the outer side of the other skate, you will probably have to change them individually. Most TV remotes are IR, so you have to aim them at the target before they “register’. The controllers also have to be turned the correct way to “see” the beam. The “eye” can’t be turned towards the skate boot sole or they’ll be blind.
- On the other hand, RF remotes use Radio Frequency to talk to the controller. No beam of light or line of sight needed. Once you learn the button locations, you can change your light colors or patterns with the remote in your pocket, just by feel. And both skates change at the same time. I’ve used both and prefer RF.
- One possible drawback to the RF remote is, if multiple people in the rink have skate lights with RF controllers, one person’s remote could change other people’s lights, too. But, that might be cool to have everyone’s lights synced and doing the same thing. 🙂
Some vendors sell Bluetooth controllers that will use an app on your phone as a remote, but I have read user reviews complaining they were unreliable, the apps are buggy, etc. I have not tried this type of controller. Stand-alone RF remotes work fine for this application.
The “Music Controller” option, with the RF remote, is my recommendation, in 1m length. In May 2019, this is $7.99 at Aliexpress, with free 25-day shipping to the US.
A similar option at Amazon, with similar shipping time, is $13.79.
Don’t forget to order Quantity=2. One for each skate.
Power Banks
This is the USB power bank I used on my skates –the black ones in the pictures above. $18.95 each, x2 – ships quickly
Starting fully charged, they will have at least 50% capacity remaining after 2 skating sessions.
The Zebra skates above have these power banks from Aliexpress.
It appears they have been discontinued.
Some other options at Aliexpress:
The LED lights don’t consume a lot of power so use the smallest USB power bank you can find. Small is important because it has to fit on your skate plate, between the trucks, and still have room to plug & unplug the USB cables. A power bank with a flat side will mate to your plate better than a round one. Pay more attention to length than thickness. Smaller=lighter.
Charging
- Dual-output USB charger – US plug – qty1 – from Aliexpress
- Right-angle micro-USB charging cable – qty2 – from Aliexpress
Mounting Materials
- Industrial strength Velcro – from Amazon (Can also buy locally)
- 1m hook & loop tape – from Aliexpress
- Hook & loop cables ties – qty10 – from Aliexpress
- Hook & loop cable ties – qty50 – from Amazon
- Black Gorilla tape – from Amazon
Batteries
CR2032 coin battery for remote – qty10 (will need 2; 1 for each remote) – from Aliexpress | from Amazon (Can also buy locally at department, drug, and hardware stores.)
If You’re Feeling “Extra”
- Glow in the dark skate laces
- LED skate laces
- LED skateboard wheels (I learned the hard way that these do NOT work on quad skates)
- EL (electroluminescent) wire
- Various bearings
- “Y” skate tool
Want to Learn More About Skating?
Want more reviews on roller skates? Check out my Best Roller Skates page for a list of all of the quad roller skates I recommend. I also have pages for roller skates for men, roller skates for women and roller skates for kids where I recommend the best skates on the market today. Or, check out my roller skates for beginners if you are completely new to roller skating.
Or, if rollerblades or inline skates are more your style, then check out my rollerblades for men, rollerblades for women or rollerblades for kids pages. Or, if you are completely new, check out my rollerblades for beginners page.